Friday, October 19, 2012

Cinnamon Swirls

My lack of blogging recently is completely inexcusable I know, but I'm going to blame it on lack of Internet (yes, we had to wait OVER A MONTH to get connected!) and the shock of coming back to uni and actually having work to do (none of that swanning around exploring France I spent most of last year doing). Anyway, I'm back and in need of catching up on all that baking time I've lost!

So the other day I decided to make some rather heavenly cinnamon swirls that I found on Edd Kimber's blog. (For those of you that don't know who he is, he won the Great British Bake Off last year. For those of you that haven't heard of/watched the Great British Bake Off, you're seriously missing out!). What a great recipe is all I can say. Honestly, eating these straight out of the oven is definitely up there with my top food loves. Crispy sugar on the outside, a soft spongy dough on the inside and then the most delicious mouthful of cinnamon at the end. Me and my housemates were in the middle of watching a film when they were ready and I made them turn it off so we could all appreciate how wonderful they tasted! And of course, the smell that wafted through from the kitchen whilst they were baking was divine. 


The only downside I suppose is that they are a bit time-consuming to make. You use a quick croissant dough, which isn't difficult, it just involves a lot of waiting around while the dough rests. Basically it's not the kind of thing to make if you've only got a couple of hours. Having said that, all the faffing around rolling out the dough and putting it in the fridge, prooving it and leaving it to rest, is 100% worth it as soon as you take a bite. Whether that's as a snack with a coffee or reheated in the microwave for breakfast, you must try these lovelies!

Cinnamon Swirls (makes 12)

Ingredients:

For the croissant dough:
600ml milk
65ml water
250g plain flour
6g dry active yeast
30g caster sugar
1/2 tsp salt
150g butter, diced and chilled

For the cinnamon swirls:
110g light brown sugar
1tbsp ground cinnamon
50g butter
granulated sugar for coating

Method:

For the croissant dough:
  1. Place the milk and water into a bowl.
  2. In a separate bowl, combine the flour, yeast, sugar and salt.
  3. Add the butter pieces and stir through with a knife until the pieces of butter become smaller, but still remain in pieces.
  4. Tip the butter mixture onto the liquid mixture.
  5. Fold everything together, but not too much so that the butter pieces become too small.
  6. Cover the bowl with clingfilm and keep in the fridge over night.
  7. In the morning, remove the dough from the fridge and place on a well-floured surface.
  8. Roll out into a rectangle roughly 20cm x 40cm.
  9. Fold into thirds. 
  10. Rotate 90 degrees so that the folds are facing you.
  11. Repeat this process twice more so that you have turned it three times. 
  12. Wrap the dough in clingfilm and leave at least for a couple of hours before using for the cinnamon rolls.
For the cinnamon rolls:
  1. Grease a tray and coat with sugar.
  2. Place the dough on a floured surface and roll out into a rectangle about 30cm x 35cm.
  3. In a small bowl mix together the sugar and cinnamon.
  4. Lightly brush the dough with the melted butter.
  5. Sprinkle the dough with the sugar mixture in an even layer.
  6. Roll the dough into a tight sausage and cut into 12 equal slices.
  7. Place the slices onto the baking tray and lightly cover with clingfilm.
  8. Leave to proove at room temperature for a couple of hours until they have doubled in size.
  9. Preheat the oven to 180 degrees and when the buns are ready bake in the oven for 20-30 minutes. 
  10. Allow the rolls to cool slightly before rolling in granulated sugar.
  11. Serve slightly warm and enjoy!

Saturday, August 25, 2012

A Basket of Bread Rolls


After watching this week's episode of The Great British Bake Off (which I am seriously addicted to already by the way!), I suddenly developed an urge to make bread. I wasn't particularly fussed which sort to be honest, I just knew I wanted to make some. Mainly because I was salivating at the thought of being drawn into the kitchen by the smell of fresh bread cooking away in the oven and being able to eat it afterwards. You just can't beat fresh bread straight from the oven spread with a layer of butter that melts the moment it touches the bread. I should know, having lived across the road from a boulangerie for a year where I could pick up a baguette that was sometimes still warm virtually whenever I wanted to. In hindsight, I was probably a bit spoilt and I wish I hadn't taken it for granted so much, because living in England (or where I live anyway) it is near-on impossible to pick up a loaf as fresh as that. Well certainly not within walking distance.

But the thing is, making bread at home, especially if you just want to make a basic loaf or roll, is ridiculously easy. I don't understand why more people don't do it! Plus, you will not be able to get bread any fresher, as you literally have to travel to your kitchen to pick it up. On top of that, it hardly needs any ingredients: flour, water, yeast, salt, a bit of sugar and you're there. So if you ever hear anything about the struggles of making bread, dismiss them straight away! 

I suppose the only slight downside of making bread is that it can be a bit fiddly and time-consuming, what with all the kneading and proving, but it's really not that horrendous! These rolls I made only needed kneading (!) for ten minutes, which is nothing really. And just think of all those calories you're burning while your arms are hard at work. As for the proving, these proved for just over an hour, and as long as you know right from the start that they've got to rest for that long, then you can get on with something else whilst they're busy doubling in size. 

And that's basically all there is to it. Bread really can be that simple to make. It's certainly a staple part of my diet, because when I think about it I probably eat some type of bread pretty much every day. So why not learn how to make it for yourself, then it can be there whenever you want it, fresher than bread from a bakery! I came across this particular recipe in Lorraine Pascale's recipe book, Home Cooking Made Easy, although I changed the white bread flour to brown. She names them after her Home Economics teacher, because that's when she first made them, and in actual fact, as I was making these, I was transported back to my Food Technology room at school when I made bread for the first time. I remember being given the option of creating whatever shape we wanted, but my favourites have to be the twists with two strands. Although it doesn't really matter what shape you form them into, because they taste delicious whether they're a round roll or a spiral. As long as they're hollow on the bottom, golden on top and soft on the inside you've made a pretty decent bread roll that is just asking to be eaten!


Brown Bread Rolls       makes 12 mini rolls

Ingredients:
280g Strong Brown Bread Flour
1tsp Salt
11/2tsp Fast-action Dried Yeast
1tsp Soft Light Brown Sugar
190ml Warm Water
1 Egg, lightly beaten 
3tbsp Poppy Seeds

Method:
  1. Put the flour, salt, yeast and sugar in a bowl.
  2. Make a well in the centre and pour in the water.
  3. Use a wooden spoon to stir it all together and once it starts getting stiff, replace the spoon with hands and bring it altogether into a ball.
  4. If it's too stiff, add a couple more teaspoons of water.
  5. Knead for ten minutes.
  6. Weigh it and divide the number by 12 to create 12 rolls of an even size.
  7. Roll each one into a ball or a shape of your choice.
  8. Place the rolls on a large baking tray and cover with oiled cling film so it's airtight but not taut.
  9. Leave the rolls in a warm place for about an hour or until they have doubled in size.
  10. Preheat the oven to 200 degrees.
  11. Brush the rolls with the beaten egg and sprinkle with poppy seeds.
  12. To create a steamy atmosphere in the oven, either spray a few squirts of water inside or place a bowl of water on the bottom shelf.
  13. Place the rolls in the oven and bake for about 15-20 minutes, until they are golden brown and sound hollow when they are tapped on the bottom.
  14. Enjoy (preferably with a good layer of butter straight from the oven!).


Friday, August 17, 2012

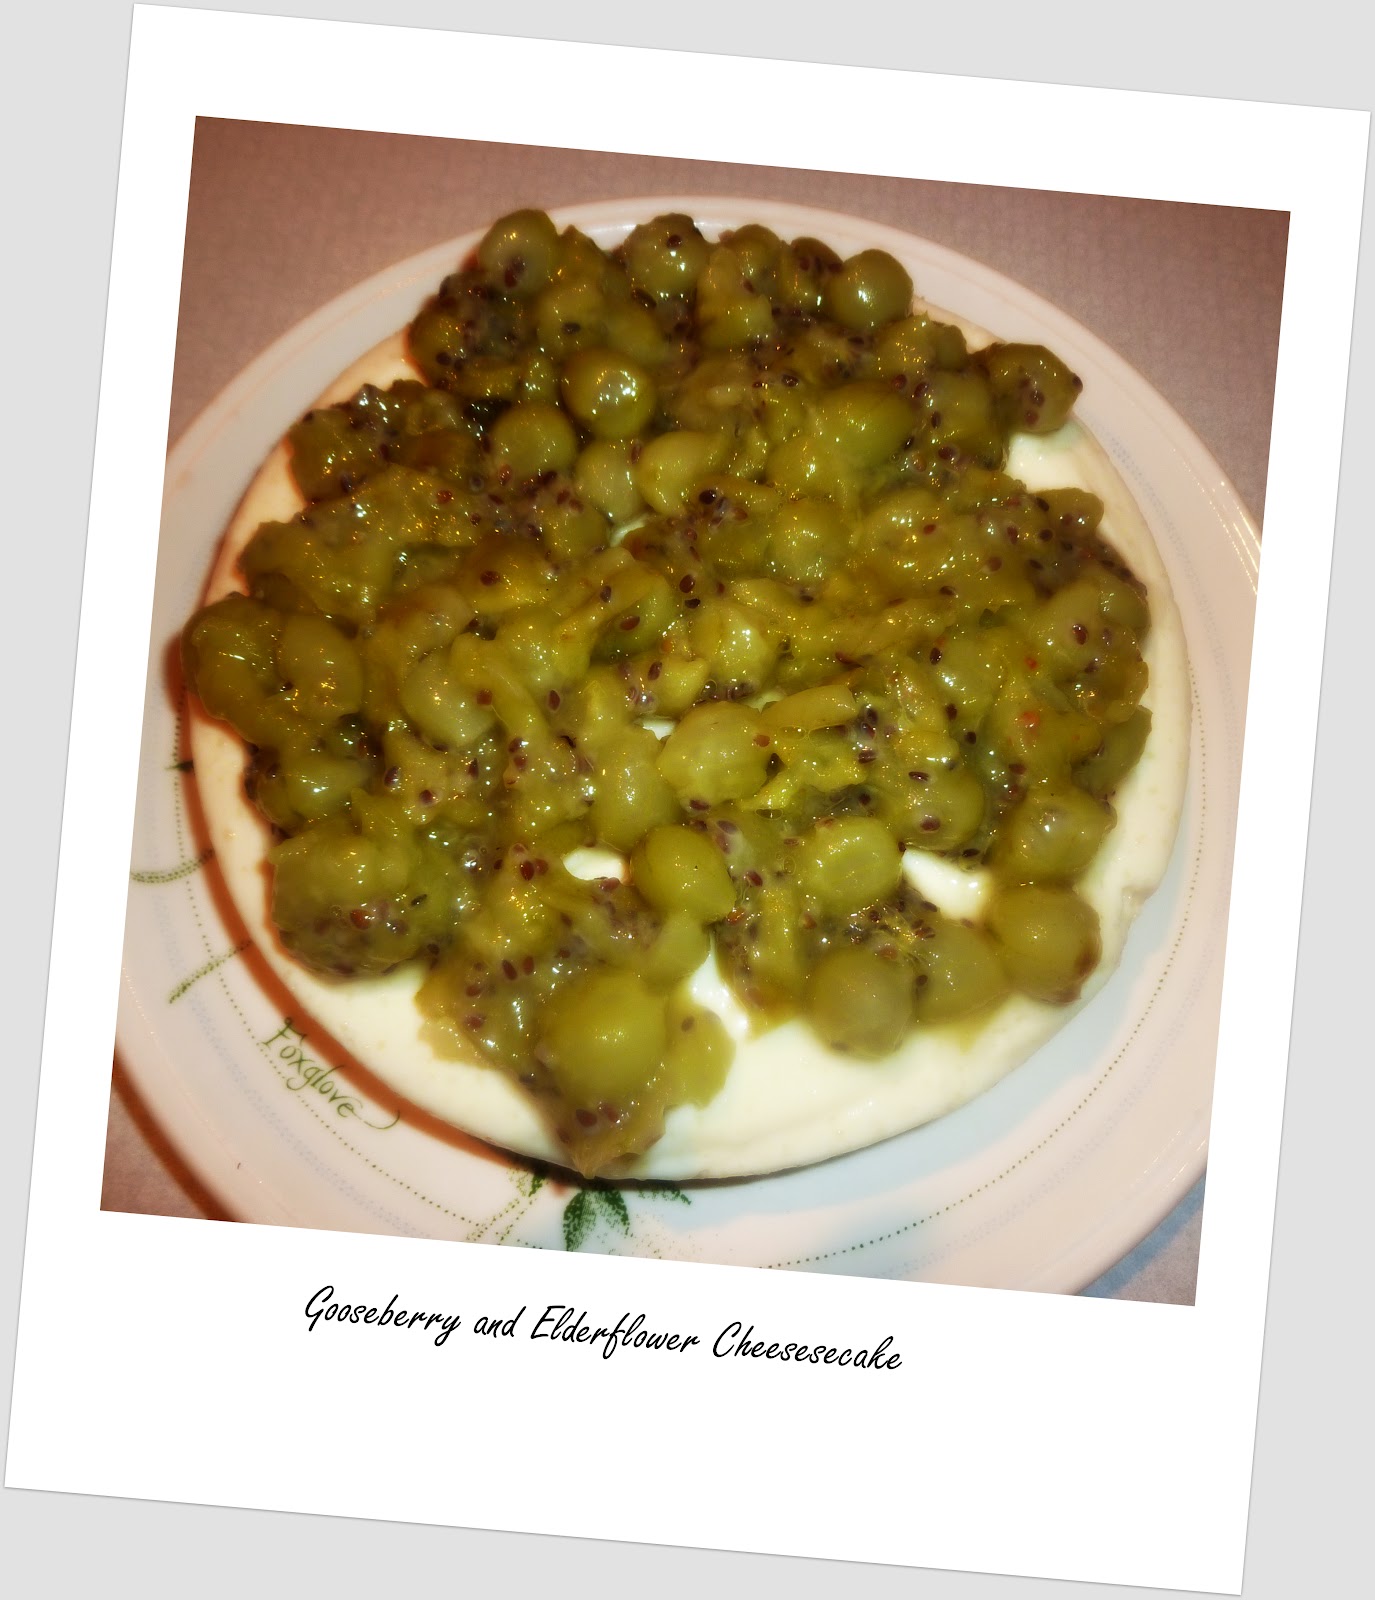
Gooseberry and Elderflower Cheesecake


I thought I was going to be spending my summer blogging away to my heart's content with nothing to do but bake and blog. Time has just been disappearing though, because for some reason I seem to have been far busier than I intended. Not that I'm complaining by any means, as being busy and having a full diary is what I like!  But I've missed baking! Anyway, the other day I finally found my way back to the kitchen and set myself the challenge of cooking up something with gooseberries. Why gooseberries, I hear you ask? I have asked my Dad this same question on several occasions, because he is the one to blame for the influx of gooseberries we have growing in our garden. And the task seems to have fallen on me to come up with a dish that can be made from them. Personally, I would have probably chosen to grow anything but these odd little berries if I had the choice, but apparently they are easy to grow as we just keep finding more and more in the garden every summer. Sour, unattractive and often forgotten about, this fruit doesn't really have a lot going for it, but after a bit of searching I eventually came upon this rather wonderful recipe for a gooseberry and elderflower cheesecake. It is even low in fat (if a cheesecake can ever be low in fat that is!). Bonus. And perhaps my opinion has been swayed so I can in fact thank my Dad for making the decision to grow these odd little berries. Because when put with the right ingredients and given something sweet, gooseberries can possibly be made into the perfect desserts.  

Speaking of desserts, I came across this quote the other day in a café which made me smile.

"Desserts is stressed in reverse...coincidence?"

I am utterly convinced that this is no coincidence at all and desserts were invented purely to take away our stresses! How brilliant would it be if all it took was a dessert to make us feel relaxed and stress-free?! If only... Although actually, as I'm sure I've mentioned before, baking and eating is enough to put me in a better mood instantly. So on that note, get baking and try this delicious gooseberry and elderflower cheesecake!


Gooseberry and Elderflower Cheesecake (serves 6-8)

Ingredients:
10 Digestive Biscuits
60g Melted Butter
250g Quark
250g Light Cream Cheese
150g Icing Sugar
1tsp Vanilla Extract
3tbsp Elderflower Cordial
1 Sachet Powdered Gelatine
350g Gooseberries (topped and tailed)
2dsp Sugar (or to taste)
2tbsp Elderflower Cordial

Method:
  1. Crush the biscuits in a blender until they resemble fine bread crumbs.
  2. Mix with the melted butter.
  3. Spoon into a greased and lined cake tin and place in the fridge for an hour to chill. 
  4. Whisk together the quark, cream cheese, icing sugar and vanilla. 
  5. Put the cordial in a heat-proof bowl and heat in the microwave until hot it starts to bubble. 
  6. Sprinkle the powdered gelatine over the top, leave for a minute or so and stir until it dissolves.
  7. Add this to the cheese mixture and stir thoroughly.
  8. Pour into the cake tin and place in the fridge to set for a couple of hours or overnight.
  9. For the gooseberries, place the berries in a small pan with the sugar.
  10. Heat until they start to burst and release juice.
  11. If there is too much excess liquid, drain it off as it doesn't want to be too watery.
  12. Stir the berries so they are a bit squashed and not whole.
  13. Add the elderflower cordial and taste - it should still be sharp but not too sour.
  14. Leave to cool, then chill the mixture in the fridge.
  15. When ready to serve, spoon the berries over the cheesecake mixture, sprinkling some flaked almonds over if you like and enjoy!


Tuesday, July 17, 2012

A Taste of France


Well, it has been over three weeks now since I've been back home and despite England feeling a little more like home again, I am still of course pining for my beloved France! So what better way to pretend that I am in fact still living the French life, than by recreating one of their wonderful desserts? At the weekend I had a go at making a crème caramel after stumbling across a very easy recipe by Delia Smith. With it being custard-based, I have to say it is probably one of my favourites and it is actually quite a light way of finishing a meal (as long as we don't think about the amount of sugar/cream it contains!). The French certainly know how to do a good dessert and this was no exception. I was very pleasantly surprised at how straight forward it was to make too, albeit a method I have never used before. The custard mixture cooks in a ramekin that stands in a tin with water in it, so essentially it is steamed. To be honest, the science of how it all works sounds a bit complicated to me. All I know is that it worked beautifully and the end result was divine. I thought I was back in France for a second...and then I looked outside and saw the grey skies and imminent rain. No, I'm definitely in England.


Crème Caramel    makes 6 individual desserts

Ingredients
110g Caster Sugar
150ml Milk
275ml Single Cream
4 Eggs
1tsp Vanilla Extract
40g Soft Brown Sugar
1tbsp Water (from the hot tap)

Method
  1. Preheat the oven to 150 degrees.
  2. Start by making the caramel. Put the sugar in a pan on a medium heat.
  3. When the sugar starts to melt and bubble, stir and continue to cook until it is a regular dark brown colour. (2 shades darker than golden syrup, according to Delia!).
  4. Remove the pan from the heat and carefully add the water.
  5. Stir until smooth and then quickly pour it evenly into each ramekin, tipping it so it covers the sides a bit. Don't worry if it starts to set at this point as it won't matter once it's cooked.
  6. Now pour the milk and cream into a separate pan and leave it to heat gently. 
  7. Whisk together the eggs, brown sugar and vanilla essence in a bowl.
  8. Once the milk is steaming hot, pour it onto the egg mixture, whisking until it is blended. 
  9. Pour the liquid into the ramekins and place them in a large roasting tin.
  10. Transfer the tin to the oven and pour cold water in it to surround the dish so it is two thirds full.
  11. Bake for 30-35 minutes.
  12. Cool and chill until it is ready to serve.
  13. Remove from the ramekin by running a knife around the edge and then turn it upside down on a plate.
  14. And voilà...enjoy!
 

Saturday, July 7, 2012

Berry Lemon Cake


I can't remember the last time I woke up to blue skies. Yesterday I had to walk through what seemed like a lake on the way to the hairdresser's. England, where is the summer please?  Now this little cake I made will not magically make the sun appear unfortunately, but it will hopefully give you a taste of summer! My Dad has decided to grow redcurrants this year so after hunting around for something to do with them I came across this recipe, which was quite wonderful. I've not really had anything with redcurrants in before I don't think, but I may be on the look-out for more. Who could resist having a bite of something which was brimming with these vibrant red jewels? Certainly not me anyway.


If you couldn't get your hand on any red currants though, you could definitely get away with using another berry instead - either raspberries or cranberries would be best. But I guess you could subistitute any other fruit you wanted really. In fact, if you used a fruit that was a bit sweeter, you could probably reduce the amount of sugar you put in, because I dread to think what the the sugar content of these little beauties is! Good job they're only small squares! Anyway, these are possibly one of the moistest cakes I've tasted, which I imagine is largely because of the dash (or two) of cream that you put in and the lemon syrup that is drizzled over just as it comes out of the oven. Surprisingly, they're fairly light too, so when the rain continues to pour over the next few days I'll be able to stuff myself with my Berry Lemon Cake and not feel as if I'm about to burst. Because let's be honest, it's unlikely that the sun will return any time soon. And I don't know about you, but I'll need something to cheer me up... 

Berry Lemon Cake     

Ingredients
175g Plain Flour
1 1/2 tsp Baking Powder
Pinch Salt
150g Unsalted Butter
150g Caster Sugar
2 Eggs
3tbsp Cream
150g Redcurrants (washed and stalks removed)
Juice of 2 Large Lemons (about 100ml)
100g Demerara Sugar

Method
Preheat oven to 180 degrees. Grease and line a baking tin with greaseproof paper.
Mix together the flour, baking powder and salt in a bowl.
In a separate bowl cream the butter and caster sugar togther so it is light and fluffy. 
Beat in the eggs one at a time, folding in a spoonful of flour after each egg.
Fold in the remaining flour and gently stir in the redcurrants and cream.
Bake in the oven for about 25-30 minutes until golden and a skewer inserted comes out clean.
While the cake is baking, combine the lemon juice and demerara sugar. When the cake comes out of the oven, pour this mixture onto the cake.
Allow to cool for about half an hour, then cut into slices and put onto a wire rack to finish cooling.
Enjoy (with a nice cup of hot tea in this weather!). 


Saturday, June 30, 2012

Gorgonzola, Pear and Caramelised Onion Cake


Apologies once again for practically disappearing off the face of the earth! These past few weeks (which were my last in France) have passed by in such a blur, but now I'm settled back in England for the summer (sob) with plenty of time on my hands to cook up some tasty treats. To take my mind off pining for France and those glorious sunnny days that just do not seem to exist here, I will be busying myself in the kitchen. A kitchen which is far more pleasant to cook in than when I was in France! So there are pluses about being back...

Oddly enough, I have chosen to cook something which I would not consider to be typically French, but very delicious nonetheless! Once you've got your head round the fact that you're eating a savoury cake that is. I watched another one of Rachel Khoo's programmes the other day (just to make me feel more at home!) and her cheese, pistachio and prune cake caught my attention. However, I thought I'd mix things up a bit and decided to give it a go with a different filling. and in fact, what makes this cake so great is that you can experiment with whatever filling you fancy. I've recently discovered that I'm actually a fan of blue cheese in small doses and since I've been in France I've tried a variation of cheese on toast with pear. With this in mind, I decided to put it all in a cake along with some caramelised onions to balance out the bitterness of the cheese. And the result was a delight. Perhaps slightly on the oily side when it first came out of the oven, but with a side of salad it made the perfect light lunch and was a bit different to a standard sandwich. It would also be a lovely addition to a picnic in the countryside...that's if the weather decides to provide us with some sunshine of course!


Gorgonzola, Pear and Caramelised Onion Cake

Ingredients
250g Plain Flour
15g Baking Powder
150g Gorgonzola, sliced
1 Red Onion
1/2 Tbsp Olive Oil
1/2 Tbsp Butter
1 Tbsp Sugar
1 Tbsp Balsamic Vinegar
1 Pear (peeled, cored and sliced)
4 Eggs
150ml Olive Oil
100ml Milk
50g Plain Yoghurt
Seasoning

Recipe
  1. Begin by making the caramelised onion to give it time to cool.
  2. Slice the onion finely and add it along with the butter, olive oil, sugar and balsamic vinegar to a frying pan.
  3. On a medium heat, cook for 10-15 minutes until the onion has caramelised. Allow to cool.
  4. Preheat the oven to 180 degrees and line a loaf tin with greased proof paper.
  5. In a bowl, mix together the flour, baking powder, gorgonzola, caramelised onions and pear.
  6. In a separate bowl, whisk the eggs until pale and fluffy, then gradually whisk in the oil, milk and yoghurt. Season well.
  7. Fold the flour mixture into the whisked eggs, careful not to overbeat. 
  8. Pour the batter into the tin.
  9. Bake for 30-40 minutes until a skewer inserted into the centre of the cake comes out clean.
  10. Allow to cool in the tin and enjoy!

Monday, June 11, 2012

Cupcakes à la Tarte aux Fraises


Gosh it's been a while! Sorry about that. The past few weeks have been very hectic and full of visitors, because I'm making the most of my final month in Aix. I can't believe I leave in 14 DAYS!! In fact, this time in 2 weeks I'll be back home. Scary. So anyway, I've not really had much time for baking because I've been swanning around absorbing every little bit of Provence to make it last until the next time I'm in France. As much as I love baking, slaving over a hot stove when it's ridiculously warm outside is not always my idea of a fun afternoon, as I've come to realise that I don't cope particularly well with the heat! But today I braved the kitchen for what may be one of my last times actually, because before I know it, I'll be back in rainy England. Great...

It was also much more of a plesant experience than usual actually. I have recently had a new flatmate move in who I can certainly say has put his stamp on the place! But actually, it's been a good thing in some ways because he bought this for the kitchen...


...which makes baking and just cooking in general a lot easier and more practical. So merci, David!
As I'm sure I may have mentioned before, une tarte aux fraises has to be one of my favourite French patisseries. Mainly because it contains crème patissière, which is basically like custard, so if a cake has some in, you can guarantee I'll choose it! But also because strawberries always look so appealing. They're definitely in season at the moment here and whenever I see them on a market stall or at the supermarché I am always tempted to buy some. As I know that I won't be able to have a tarte aux fraises that's quite as good as I'm used to when I'm back home, I thought why not take the idea of this French treat and put it into a cupcake. That way one mouthful will remind me of being in France, but I won't be disappointed that it doesn't reach French standards, because there's a little bit of a twist to it. And I have to say, I'm pretty impressed! Perhaps only for those who have a very sweet tooth, but deliciously strawberry-flavoured too. So hopefully in one bite I'll be transported back to France when I recreate these little beauties back at home. Which I shall certainly be doing!


Strawberry Tart Cupcakes      makes 12

Ingredients:
For the crème patissière (taken from Rachel Allen's recipe here):
2 Egg Yolks
1/4 cup Caster Sugar
1tbsp Plain Flour, Sifted
1/4tsp Vanilla Essence 
175ml Milk
For the cupcakes:
1 cup Butter
1 cup Sugar
2 Eggs
1/2 cup Milk
2 tsp Vanilla Extract
2 tsp Baking Powder
1 1/2 cups Plain Flour
10 Strawberries (medium-sized)
6 Strawberries (small, for decorating)

Method:
  1. Start by making the crème patissière. In a bowl, whisk the egg yolks and sugar together until light and thick, then stir in the flour.
  2. Put the milk in a pan and bring it slowly to the boil.
  3. Pour the milk onto the egg mixture, whisking constantly.
  4. Put the mixture back in the pan and bring to a gentle boil once more.
  5. Cook for 2 minutes, stirring all the time, until it has thickened. Use a whisk to get rid of any lumps that may form.
  6. Remove the pan from the heat and add the vanilla essence. If the mixture is still lumpy at this stage, you can push it through a sieve.
  7. Transfer to a bowl and cover (touching) with cling film to prevent a skin from forming. Allow to cool. 
  8. Next make the cupcakes. Preheat the oven to 180 degrees and grease and flour the cupcake holders or line a bun tin with bun cases.
  9. Melt the butter over a low heat.
  10. Remove from the heat and beat in the sugar until combined.
  11. Allow to cool for about 5 minutes, until it is lukewarm.
  12. Whisk in the eggs.
  13. Add the milk, vanilla essence and baking powder, then beat again to combine.
  14. Stir in the flour until just combined.
  15. Fold in the strawberries.
  16. Fill each cupcake holder with mixture and bake for about 20-25 minutes, until a skewer inserted comes out clean.
  17. Allow to cool.
  18. To assemble the cupcakes, cut a small circle into each cupcake and spoon it out carefully. Cut this circle in half.
  19. Place a spoonful of the crème patissière in the hole.
  20. Put each half of the circle into the crème patissière like wings and place half a strawberry in the middle.
  21. Repeat with each cupcake and voilà...your cupcake is ready to enjoy!